
The single most effective way to restore a sluggish laptop to peak performance in 2026 isn’t a factory reset or a costly new purchase; it’s a focused hardware transition. If you’re struggling with a machine that takes minutes to boot or freezes during basic tasks, you aren’t alone. Many users feel the anxiety of potential data loss or the fear of damaging internal components when considering a DIY fix. This guide simplifies the process by teaching you exactly how to replace a laptop hard drive with SSD using professional techniques that prioritize data integrity and operational stability.
We agree that your time is too valuable to waste on loading screens. Our promise is to provide a clear, step by step path to significantly boost your laptop’s speed and reliability. You’ll learn how to navigate the current 2026 market, identify if your laptop supports the latest PCIe 5.0 standards, and execute a successful data migration. We’ll also explain why 4TB drives have become the value sweet spot in the current economy. This article covers everything from hardware selection to the final boot, ensuring your device feels brand new without the cost of a full replacement.
Key Takeaways
- Understand why moving to flash memory provides a 10x speed advantage over traditional mechanical drives in 2026.
- Learn how to replace a laptop hard drive with SSD by identifying the correct hardware interface, whether it’s 2.5-inch SATA or M.2 NVMe.
- Determine the best data transition strategy by weighing the convenience of drive cloning against the performance benefits of a fresh OS installation.
- Gain the confidence to perform a hardware swap with a professional step-by-step guide on opening laptop cases and securing internal components.
- Optimize your new storage for the long term by configuring BIOS/UEFI settings and enabling system-level TRIM support for maximum durability.
Understanding the HDD to SSD Transition: Why It Matters in 2026
Upgrading your storage remains the most impactful hardware modification you can perform on a laptop. The transition involves moving from a mechanical Hard Disk Drive (HDD), which relies on physical spinning platters and a moving read head, to a modern Solid-state drive. A Solid-state drive is a storage device that uses integrated circuit assemblies to store data persistently. This fundamental shift from mechanical motion to electrical signals eliminates the primary bottleneck in mobile computing. Knowing how to replace a laptop hard drive with SSD allows you to bypass the physical limitations of legacy hardware and access modern data transfer rates.
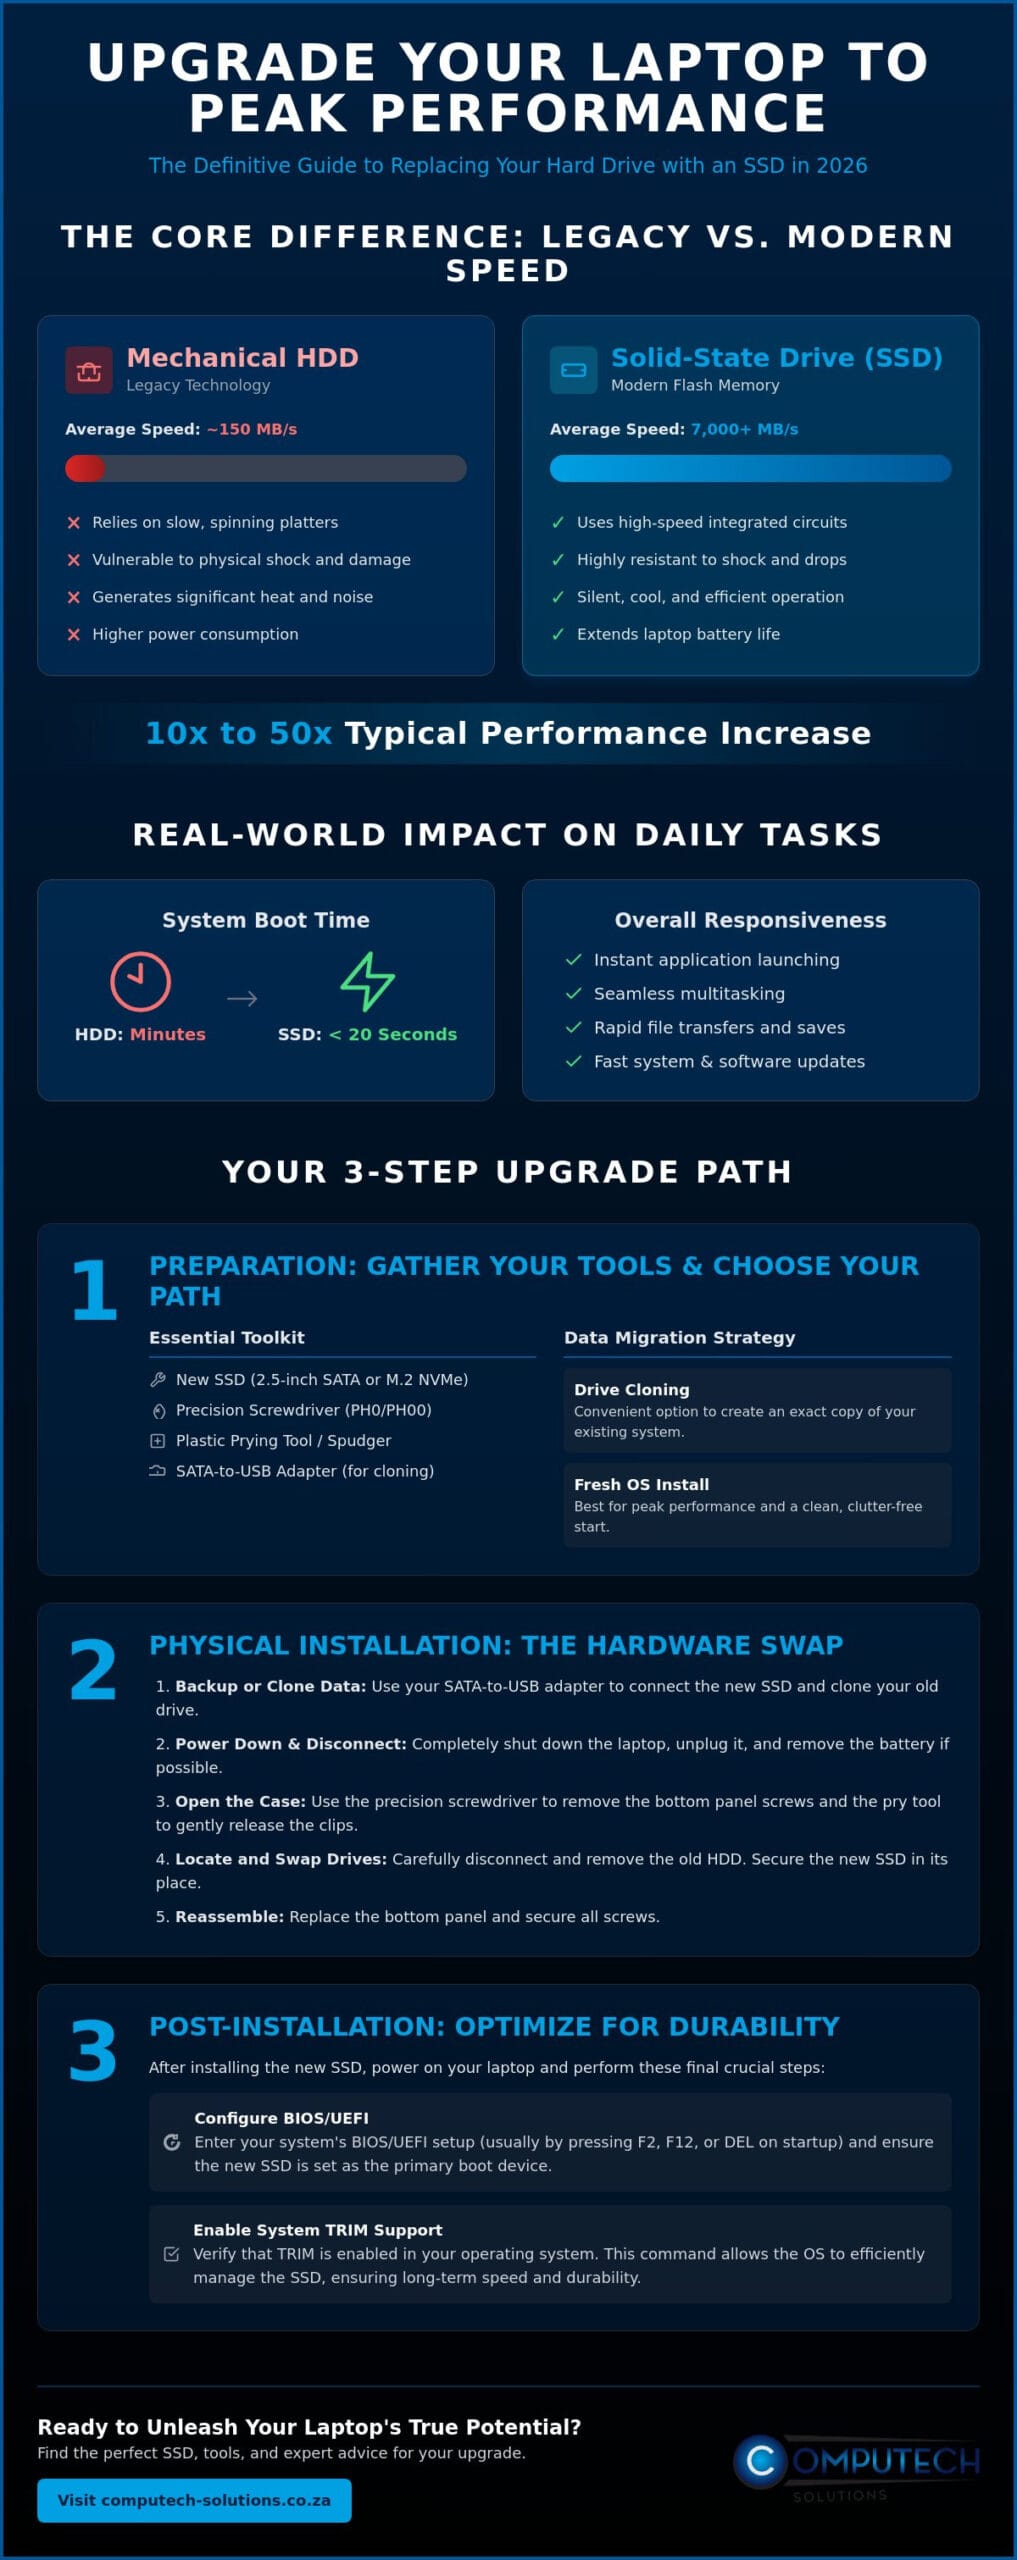
The performance disparity between these technologies has reached a critical point in 2026. While traditional mechanical drives struggle to exceed 150 MB/s, mainstream PCIe 4.0 SSDs now regularly exceed 7,000 MB/s. High-performance PCIe 5.0 units can even reach sequential read speeds of 14.5 GB/s. This “speed gap” means that an SSD is not just slightly faster; it’s often more than ten times quicker than the drive it replaces. This speed affects everything from the initial boot sequence to the background processing of system updates, ensuring your laptop remains responsive even under heavy workloads.
Beyond raw speed, the move to flash memory offers significant durability and efficiency benefits. Because SSDs have no moving parts, they’re inherently resistant to physical shock. This is a vital feature for South African students and commuters who frequently transport their devices. Additionally, SSDs require less power to operate and generate significantly less heat. Improved power efficiency is especially valuable during power outages, as it can extend your laptop battery life, giving you more productive time when you’re away from a charger.
Mechanical HDD vs. Solid State Drive
The physical differences between these drives are stark. An HDD operates like a record player, with a mechanical arm reading data from spinning magnetic disks. This movement creates heat, noise, and a constant risk of mechanical failure if the laptop is bumped. In contrast, an SSD uses NAND flash cells to store data. This silent operation reduces the thermal load on your laptop’s cooling system and eliminates the “whirring” sound associated with older machines. By learning how to replace a laptop hard drive with SSD, you’re effectively removing the only part of your computer that’s prone to physical wear and tear.
Performance ROI for Older Laptops
Many users believe a slow laptop requires more RAM, but 8GB of memory is often held back by the slow response times of a mechanical drive. Replacing that drive provides an immediate return on investment. You’ll see boot times drop from several minutes to under twenty seconds. Daily tasks, such as launching professional software suites or installing Windows updates, become nearly instantaneous. This upgrade targets the specific component that causes system “hangs” and freezes, breathing new life into older hardware that would otherwise be considered obsolete.
Essential Checklist: What You Need Before Starting
Success in technical upgrades depends entirely on preparation. Before you learn how to replace a laptop hard drive with SSD, you must gather the specific tools required for modern chassis. Most laptops use tiny Phillips-head screws, which require a PH0 or PH00 precision driver. Avoid using standard household tools; they’ll strip the heads and turn a simple upgrade into a permanent hardware lockout. You also need a plastic prying tool or spudger to separate the bottom panel clips without scratching the finish. Finally, ensure you have a clean, non-carpeted workspace. Static electricity can destroy motherboard circuits instantly, so working on a wooden or anti-static surface is mandatory.
If you plan to keep your current files, an external enclosure or SATA-to-USB adapter is essential. This allows you to connect the new SSD to your laptop while the old drive is still inside, facilitating the cloning process. While you’re preparing your hardware, it’s also a good time to check your power source. If your device struggles to hold a charge even with a new drive, you might consider browsing replacement laptop batteries to complete your system overhaul. For a detailed visual breakdown of these tools in action, Seagate’s SSD upgrade guide provides excellent manufacturer-specific insights.
Choosing the Right SSD Form Factor
Modern laptops typically utilize one of two form factors. Older or larger “budget” models often feature a 2.5-inch SATA slot, which looks like a small brick. However, most machines produced in the last five years use M.2 NVMe slots, which resemble a thin stick of gum. Check your laptop manual or BIOS under “Storage Information” to verify your specific slot type. In 2026, 500GB is the absolute minimum capacity you should consider. Given current market trends, 1TB or 4TB drives often offer much better long-term value per gigabyte.
Preparing Your Digital Environment
Digital safety is as vital as physical safety. Back up your critical files to a cloud service or an external drive before starting. This acts as a safety net if the cloning process fails. Ensure your Windows activation key is linked to your Microsoft account for easy reactivation once the new drive is detected. Finally, download your chosen cloning software or create a Windows installation media tool on a spare USB drive. Having these assets ready ensures the software transition is as smooth as the hardware swap.
Data Migration: Cloning Your Drive vs. Fresh Installation
Deciding between cloning and a fresh install is a critical step in learning how to replace a laptop hard drive with SSD. Cloning creates an exact bit-for-bit replica of your existing system, including all your specialized software, browser history, and personal settings. It’s the most efficient choice for users who want to resume work immediately without the hassle of reconfiguration. Conversely, a fresh installation wipes away years of registry errors and software bloat, providing the cleanest possible performance on your new hardware.
You must prioritize power stability during this phase. A power failure during data migration can lead to partition errors or corrupt both your old and new drives. Ensure your laptop is charged to 100% and remains plugged into a reliable AC adapter throughout the process. Given the persistent risk of load shedding, we strongly recommend performing this task while connected to a Uninterruptible Power Supply (UPS). If you don’t have a UPS, verify that your laptop battery is in peak health to handle the high-intensity data transfer without shutting down unexpectedly. Reliable power is just as important as the hardware itself when performing a system overhaul.
The Cloning Process Step-by-Step
To clone your drive, connect the new SSD using a USB adapter or external enclosure. Professional software like Macrium Reflect or Acronis Cyber Protect Home Office is the standard in 2026 for this task. You’ll need to carefully select your current HDD as the “Source” and the new SSD as the “Destination.” Double-check these selections; choosing the wrong destination will result in permanent data loss on your primary drive. Once the software maps the partitions to fit the new drive’s capacity, the transfer begins. Keep the laptop stationary during this time to prevent any connection breaks.
When to Choose a Fresh Windows Install
If your current system feels sluggish or has been compromised by malware, a fresh install is the superior option. Use the Windows Media Creation Tool to prepare a bootable USB drive before you start the hardware swap. This method ensures you aren’t carrying over corrupted files or “junk” software to your new, high-speed hardware. It essentially gives you a “day one” experience with your machine. After the installation, you’ll need to manually reinstall your essential drivers for Wi-Fi and display, ensuring your system communicates correctly with its new storage architecture.
Physical Installation: Step-by-Step Hardware Swap
Transitioning from software preparation to physical handling requires a focus on precision and safety. Once your data is secured, the process of how to replace a laptop hard drive with SSD moves to the internal chassis. You must follow a specific sequence to protect your motherboard from electrical damage. Start by powering down the laptop completely through the operating system; don’t just use sleep mode. Unplug the AC adapter and any peripheral devices. This ensures no current is actively flowing through the system as you begin the disassembly.
Follow these steps to complete the hardware swap:
- Step 1: Place the laptop upside down on a flat, stable surface. Remove all bottom panel screws and organize them by length.
- Step 2: Use a plastic prying tool to gently separate the bottom cover from the chassis, starting at the hinges or a corner.
- Step 3: Locate the internal battery connector and carefully unplug it from the motherboard. This is a critical safety step that prevents short circuits during the installation.
- Step 4: Unscrew the mounting bracket of the existing HDD or the single screw holding the M.2 stick. Slide the old drive out and replace it with your new SSD.
- Step 5: Secure the new drive with the original screws, reconnect the internal battery, and snap the bottom panel back into place.
If you notice your internal battery appears swollen or if your device has been losing charge quickly, this is the ideal time to perform a dual upgrade. You can find reliable replacement laptop batteries for major brands like Dell, HP, and Lenovo to ensure your newly fast laptop also maintains its portability.
Accessing the Internal Components
Modern laptops often use screws of varying lengths to secure the bottom panel. Putting a long screw into a short hole can pierce the palmrest or damage the motherboard. We recommend using a magnetic mat or even a simple egg carton to keep these screws organized according to their original positions. When prying the case open, only use plastic tools. Metal screwdrivers will scratch the finish and may snap the delicate plastic clips that hold the chassis together. Once inside, identify your storage slot; a 2.5-inch bay is a large rectangular cage, while an M.2 slot is a small connector typically located near the RAM.
Securing the New Drive
When installing a 2.5-inch SATA SSD, ensures the connector is firmly seated in the port before tightening the mounting bracket. For M.2 NVMe drives, insert the stick at a 30-degree angle until it’s fully seated, then press it down and secure it with the mounting screw. Never leave an M.2 drive loose; the screw is necessary for both physical stability and proper electrical grounding. The internal battery must be reconnected only after the drive is fully secured and all tools are moved away from the motherboard. This final connection restores power to the system, preparing it for its first high-speed boot.
Post-Installation: Optimization and Sourcing Parts
After you complete the physical steps of how to replace a laptop hard drive with SSD, the first boot is your most critical milestone. You must enter the BIOS or UEFI menu immediately, typically by tapping F2, F12, or the Delete key during the startup splash screen. Navigate to the storage or boot configuration section to verify that the system detects the new drive. If the SSD isn’t listed, you’ll need to power down and re-examine the internal connections. Once confirmed, ensure the boot order is set to prioritize your new storage or the USB installation media you prepared earlier.
Maintaining the health of your new drive requires specific software configurations. Unlike old mechanical drives, SSDs rely on a feature called TRIM. This command allows the operating system to inform the drive which data blocks are no longer in use, which prevents performance degradation over time. You can check this in Windows by opening the Command Prompt as an administrator and typing “fsutil behavior query DisableDeleteNotify”. A result of “0” indicates that TRIM is active and your drive is functioning optimally.
Your old mechanical hard drive still has value even after the upgrade. Instead of discarding it, you can purchase an inexpensive external USB enclosure to convert it into a high-capacity backup drive. This provides a secondary storage tier for large files that don’t require the high speeds of an SSD, such as photo archives or long-term backups. It’s a cost-effective way to ensure no hardware goes to waste while keeping your new system lean and fast.
Optimising Windows for SSD Performance
Modern operating systems are designed with flash storage in mind, but manual checks provide extra peace of mind. You should ensure that legacy disk defragmentation is disabled. While Windows usually handles this automatically, manual defragging is unnecessary and can cause premature wear on the NAND flash cells. Instead, use the “Optimize” tool within the drive properties menu. We also recommend checking the SSD manufacturer’s website for firmware updates. These updates often resolve subtle compatibility bugs and can improve the drive’s power management features during long work sessions.
Reliable Hardware with Computech-Solutions
Success in any hardware project depends on the quality of the components you source. We offer a comprehensive catalog of high-performance storage options and specialized parts, including Acer replacement laptop batteries, to ensure your device remains portable and powerful. Sourcing your components from a specialized South African provider ensures you receive technical support and hardware that is verified for local conditions. Our nationwide delivery service covers all major regions, ensuring your upgrade parts arrive safely and promptly. Browse our high-performance SSDs and laptop spares today to complete your system restoration with confidence.
Restore Your Laptop’s Peak Performance
Upgrading your storage is the most reliable way to extend the operational lifespan of your machine. By following professional standards for data migration and physical handling, you’ve learned how to replace a laptop hard drive with SSD without risking your valuable files or delicate internal circuitry. Success relies on choosing the correct form factor, maintaining absolute power stability during cloning, and executing a precise hardware swap. These steps don’t just solve current performance frustrations; they prepare your device for the high-speed demands of 2026 software.
We specialize in providing the high-quality components you need to complete this project successfully. As experts in brand-name replacement parts, we offer dedicated technical support for South African users to ensure your transition is seamless. Whether you require a new drive or a high-capacity power cell to support your system’s new speed, we provide reliable solutions. Upgrade your laptop today with nationwide delivery from Computech-Solutions on all SSDs and laptop batteries. Your laptop doesn’t need to be replaced when a targeted hardware upgrade can make it feel brand new again.
Frequently Asked Questions
Will replacing my hard drive with an SSD void my laptop warranty?
Replacing a storage drive typically doesn’t void your warranty if the laptop has a designated service door. However, some manufacturers use “warranty void if removed” stickers on internal chassis screws. You should check your specific model’s documentation to confirm if opening the main case affects your coverage. If you’re unsure, consulting a professional technician can help you navigate these manufacturer-specific restrictions safely.
How much faster will my laptop be after an SSD upgrade?
Most users experience a massive performance jump, with system boot times dropping from several minutes to under 20 seconds. Beyond startup, application launch speeds and system responsiveness improve by up to 10 times compared to mechanical drives. This is the primary reason why learning how to replace a laptop hard drive with SSD is the most cost-effective upgrade in 2026.
Do I need to buy a specific brand of SSD for my Dell or HP laptop?
You don’t need a specific brand like Dell or HP for the SSD itself as long as the interface matches. Storage drives use industry-standard SATA or NVMe connectors that work across all major laptop brands. Focus on performance specifications and reliability ratings rather than matching the drive brand to your laptop’s manufacturer to ensure the best value for your budget.
What happens if the power goes out while I am cloning my drive?
A power failure during the cloning process often leads to data corruption or a bricked operating system. This is why we emphasize using a UPS or ensuring your laptop battery is at 100% capacity before starting. If a failure occurs, you’ll likely need to format the new drive and restart the cloning process from the beginning using your original source drive.
Can I use my old hard drive as an external storage device after the swap?
Yes, you can easily repurpose your old mechanical drive as an external backup device. By placing it in a standard 2.5-inch USB enclosure, you create a high-capacity portable drive for storing movies, photos, or system backups. This ensures your legacy hardware continues to provide value long after the internal upgrade is complete and your system is running on flash storage.
How do I know if my laptop supports an NVMe M.2 SSD or just SATA?
You can identify support by checking your laptop’s technical specifications in the BIOS or the manufacturer’s manual. Physically, NVMe slots usually have a single “M-key” notch, while SATA M.2 slots may have two notches. If your laptop was manufactured after 2021, it likely supports the faster NVMe standard, which offers significantly higher data transfer rates than the older SATA interface.
Is 256GB enough for an SSD in 2026, or should I go larger?
In 2026, 256GB is generally considered insufficient for most users due to the increasing size of operating systems and modern applications. We recommend a minimum of 500GB, though 1TB has become the standard for professional and student use. Opting for a larger drive now prevents the need for another hardware swap in the near future as your data requirements grow.
Do I need to reinstall my drivers after swapping the hard drive?
If you choose the cloning method, your existing drivers are copied over and you don’t need to reinstall them. However, if you perform a fresh installation of Windows, you’ll need to download and install essential drivers for your Wi-Fi, chipset, and display adapters. Having these drivers ready on a USB stick before you learn how to replace a laptop hard drive with SSD saves significant time.
