
What if that flickering line across your display isn’t a sign that you need to replace your entire R15,000 laptop, but just a signal for a targeted hardware update? When your display begins to glitch, the immediate fear of a massive repair bill or total work disruption can be overwhelming. It’s a common frustration to feel stuck between a potential GPU failure and a simple panel issue while your productivity grinds to a halt. Recognizing the specific signs of a failing laptop screen is the first step toward restoring your operational efficiency without the stress of uncertainty.
Once you have confirmed the signs of a failing laptop screen through our diagnostic tests, the focus shifts to sourcing a precision-matched component. Laptop displays are not universal; even within the same model range, manufacturers often use different specifications. Identifying the exact requirements for your device ensures a seamless installation and restores your hardware to its original operational standard. Sourcing high-quality parts is the most effective way to protect your investment and avoid the recurring disruptions associated with inferior, grey-market components; companies like Hytech demonstrate how specialized display solutions can provide the reliability needed for professional settings.
We understand that technical stability is vital for your daily output. This professional diagnostic guide will help you determine exactly what’s wrong with your display so you can make an informed, cost-effective decision. You’ll learn how to isolate software glitches from hardware defects and gain a clear understanding of when to invest in laptop LCD replacement panels. We’ll provide the technical clarity you need to move from a broken display to a streamlined solution, ensuring your hardware remains a reliable partner in your professional growth.
Key Takeaways
- Identify the visual signs of a failing laptop screen, such as persistent vertical lines or flickering, to distinguish between temporary glitches and permanent hardware damage.
- Master the 3-step diagnostic test using an external monitor and BIOS check to isolate whether the issue is the LCD panel or a deeper motherboard problem.
- Learn to recognize physical symptoms like “ink blots” and backlight failure that indicate a need for professional hardware intervention.
- Navigate the technical requirements for sourcing laptop LCD replacement panels in South Africa, ensuring you choose the correct resolution and pin-count for your specific model.
- Gain clarity on whether your display issues are a quick software fix or if a hardware replacement is the most efficient path to restoring your productivity.
Common Visual Red Flags: How to Spot a Failing Laptop Display Early
Visual disruptions are often the first tangible signs of a failing laptop screen. While some display issues stem from software conflicts, persistent visual anomalies usually indicate that the physical hardware is reaching its end of life. Identifying these red flags early helps you avoid sudden work stoppages and allows for a managed transition to new hardware or replacement parts. When your display begins to deviate from its standard performance, it’s rarely a random occurrence; it’s a signal that the internal components are under stress.
Flickering and Lines: The Warning Shots
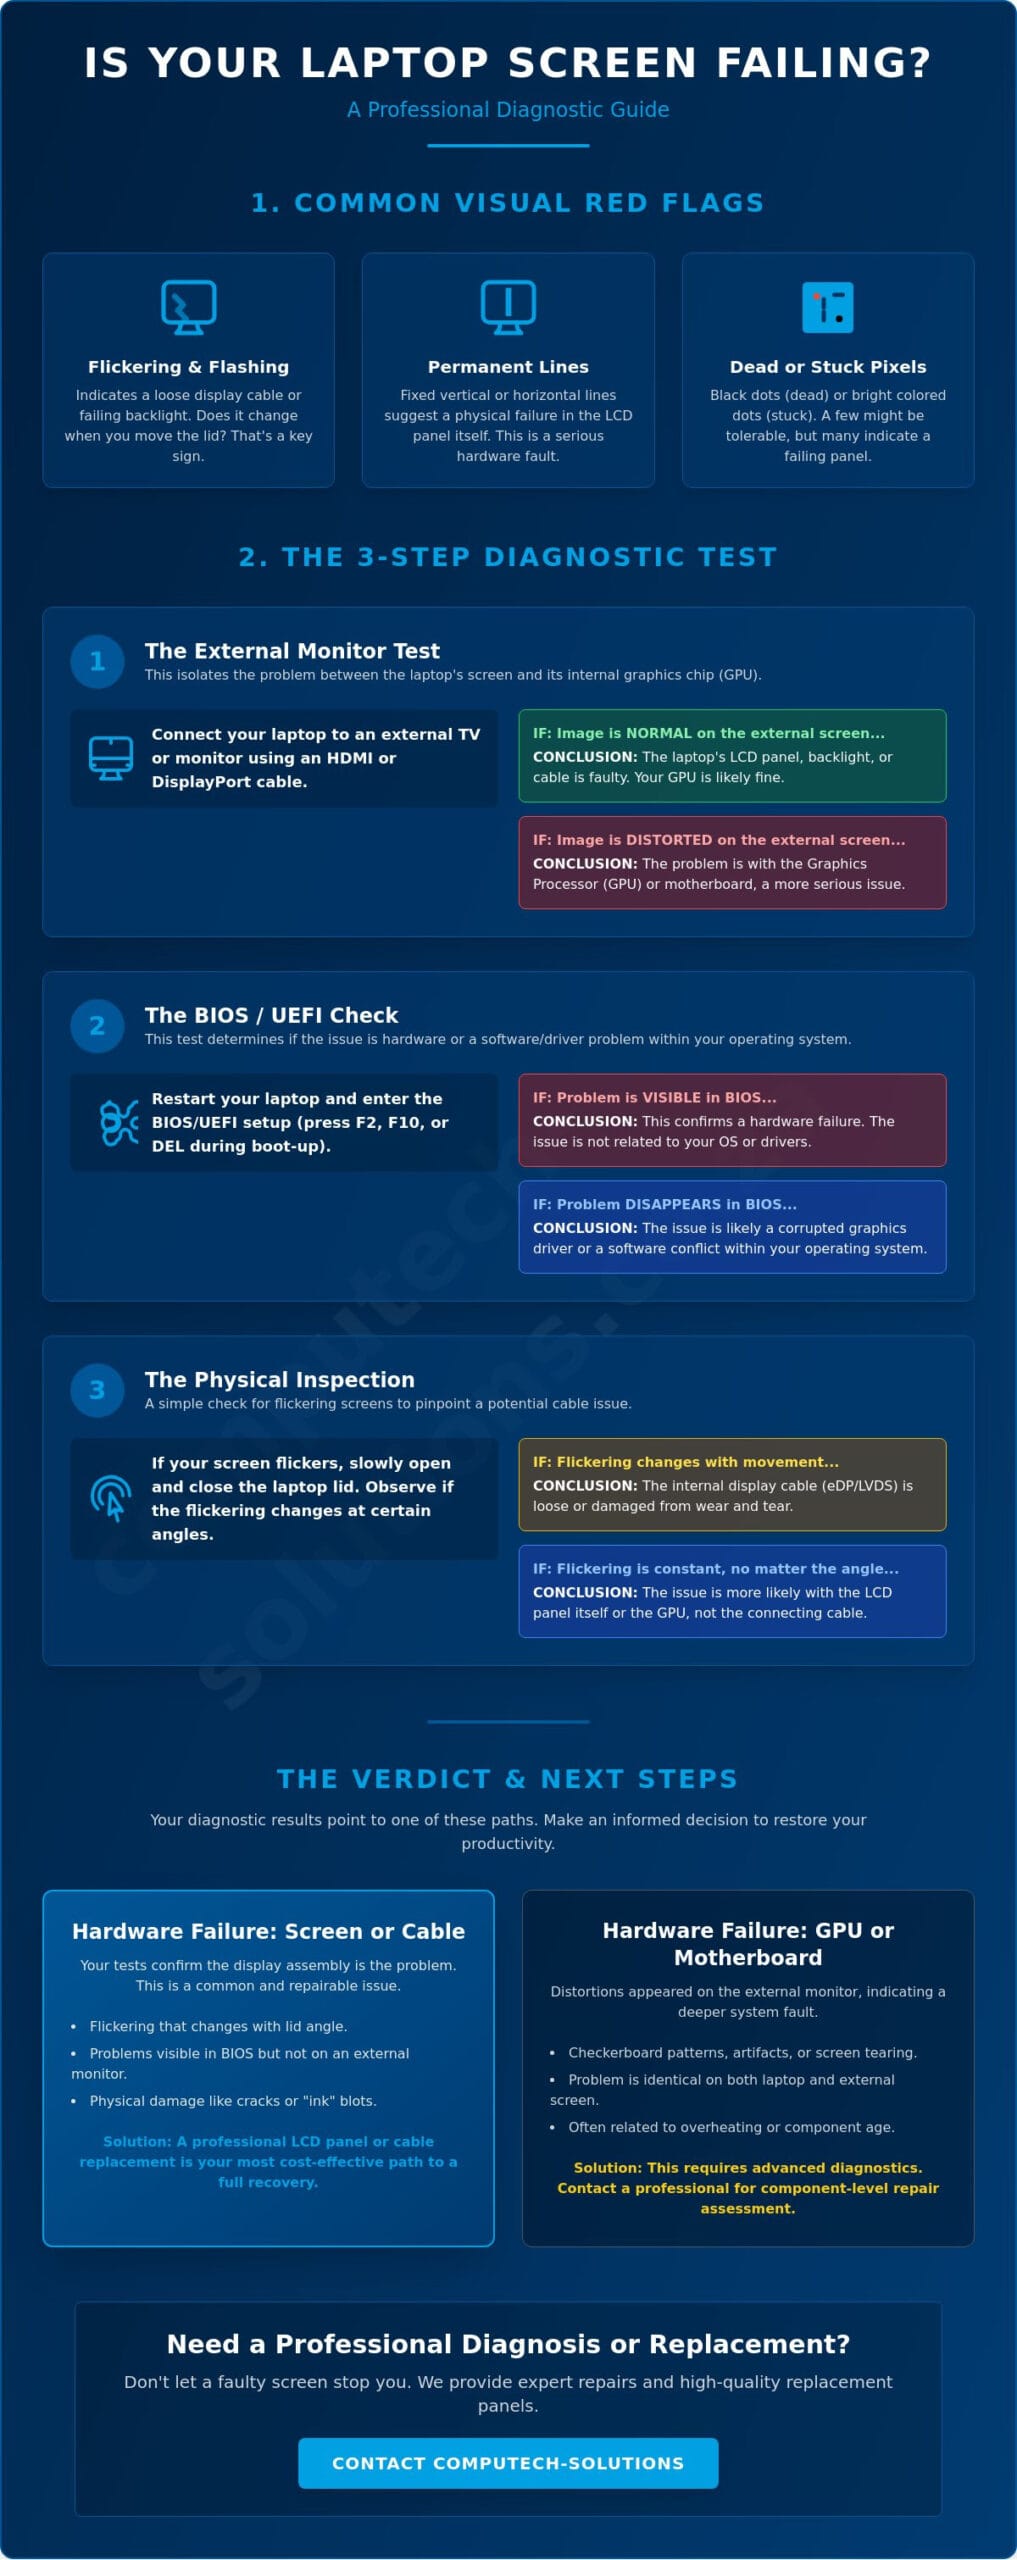
Intermittent flickering or flashing often points to a compromised connection between your laptop’s motherboard and the display panel. Most modern laptops use an Embedded DisplayPort (eDP) or Low-Voltage Differential Signaling (LVDS) ribbon cable. When these cables loosen or fray due to the repeated mechanical stress of opening and closing the lid, the signal becomes unstable. You might notice the screen stabilizes at a certain angle. This is a clear hardware warning that the physical connection is failing.
Vertical or horizontal lines that remain fixed on the display are typically more serious. These usually stem from a failure in the gate drivers or the glass substrate of the LCD itself. While a refresh rate mismatch in your display settings can occasionally cause a temporary jitter, permanent lines that appear during the boot sequence indicate a hardware breakdown. If the distortion persists when you change resolutions or enter the BIOS, the panel likely requires a replacement. Distinguishing between a single stray line and full-screen distortion is key; a single line often suggests a specific row of pixels has failed, whereas full-screen noise might involve the display cable or the GPU.
Pixel Failures and Ghosting
Individual pixel issues are common as screens age or suffer from manufacturing defects. It’s helpful to distinguish between defective, dead, or stuck pixels. A dead pixel remains black because it receives no power; a stuck pixel appears as a bright red, green, or blue dot. While software tools can sometimes “massage” a stuck pixel back to life by rapidly cycling colors, a dead pixel is almost always a permanent hardware failure. If you notice these dots multiplying, the panel’s integrity is compromised.
Ghosting or trailing occurs when the screen’s response time degrades. You’ll see faint “shadows” of previous images or windows that linger on the screen long after you’ve closed them. This suggests the liquid crystals within the panel are no longer reacting at the required speed. Similarly, visual artifacts like blocky patches often suggest a failing panel. If your screen remains dim even when brightness is set to 100%, the backlight or inverter is likely failing. Recognizing these signs of a failing laptop screen early ensures you can source the correct laptop LCD replacement panels before the display becomes entirely unreadable.
Software Glitch or Hardware Failure? Isolating the Root Cause
Before investing in a replacement, you must determine if the disruption is a logical error or physical hardware degradation. Distinguishing between these two can save you from unnecessary downtime and expenditure. Often, what appears to be one of the definitive signs of a failing laptop screen is actually a conflict within the operating system or a corrupted graphics driver. System updates or sudden power surges can corrupt the software that translates data into images, resulting in visual “noise” or stuttering that mimics a hardware defect.
The GPU vs. LCD Panel Debate
Isolating the root cause requires a systematic approach to identify whether the motherboard or the display is at fault. If you see blocky patches, “checkerboard” patterns, or screen tearing that appears and disappears as the system heats up, the culprit is likely the Graphics Processing Unit (GPU) rather than the LCD panel itself. Overheating is a primary cause of GPU instability, especially in high-performance or gaming laptops. In some cases, an aging laptop battery provides inconsistent voltage to the motherboard, which can manifest as backlight flickering or sudden dimming. This power instability is often mistaken for a failing display, making it essential to test the device while plugged into a stable power source with a reliable charger.
Software Troubleshooting Steps
To verify a software conflict, boot your laptop into Safe Mode. This environment uses a basic VGA driver, bypassing the advanced graphics software that might be causing the error. If the display remains clear in Safe Mode, you are likely dealing with a driver issue rather than a physical failure. You can then use manufacturer-provided diagnostic tools or follow a process for isolating the root cause through a clean boot of Windows or macOS.
Rolling back a recent driver update or adjusting your resolution can also help. Sometimes, lowering the refresh rate from 144Hz to 60Hz stabilizes a struggling system. If these software adjustments fail to resolve the issue, it’s a strong indicator that the hardware has reached its limit. When software fixes no longer provide stability, you can explore high-quality laptop LCD replacement panels to restore your device’s clarity and ensure your professional operations continue without further disruption.
Physical Symptoms and Environmental Factors Affecting Laptop Screens
While visual glitches often signal internal data errors, physical symptoms like internal bleeding or backlight failure represent a direct breakdown of the display’s architecture. Environmental factors in South Africa, particularly our unique power grid challenges, play a significant role in accelerating these issues. Recognizing the physical signs of a failing laptop screen allows you to distinguish between a simple component swap and a total hardware failure. When the environment or physical stress impacts the panel, the results are usually permanent and require a structured approach to repair.
Backlight and Inverter Issues
If your laptop powers on and you hear the cooling fans but the screen remains entirely dark, you might be facing a backlight or inverter failure. You can confirm this by performing the “Flashlight Test.” Hold a bright light close to the panel at an angle while the device is on. If you can see the faint outlines of your desktop or open windows, the LCD itself is still functional, but the light source behind it has failed. Modern LED displays usually integrate the backlight into the panel, meaning the entire screen requires replacement. Older models using CCFL technology often rely on a separate inverter board. If the inverter struggles to provide consistent power, you may notice the screen flickering or a faint buzzing sound before it goes dark.
Power Fluctuations and Surges
Load shedding creates a specific, high-risk environment for sensitive display components. The frequent cycling of power often leads to significant voltage spikes when the grid returns, which can easily damage the delicate circuitry on the display’s controller board. These surges can manifest as sudden dead pixels or a complete loss of signal. To mitigate this risk, it’s essential to use a high-quality laptop charger with built-in surge protection. These units act as a vital buffer, ensuring that unstable current doesn’t reach your motherboard or the display’s sensitive internal components.
Beyond electrical instability, South African climate conditions also contribute to panel degradation. Excessive humidity in coastal regions can lead to internal corrosion or delamination of the screen layers. Internal bleeding is another common physical symptom, often appearing as a black “ink blot” that expands over time. This occurs when the liquid crystal layer is crushed or punctured due to pressure, such as a heavy object being placed on the laptop lid. Unlike software errors, these physical signs of a failing laptop screen indicate that the hardware’s structural integrity is compromised, making a professional replacement the most reliable path forward.
The 3-Step Diagnostic Test: Confirming Your Screen Needs Replacement
Once you have identified the potential signs of a failing laptop screen, you must confirm the diagnosis through a structured testing process. This prevents the common mistake of replacing a functional LCD panel when the issue actually lies with a loose cable or a motherboard defect. By following these three specific steps, you can isolate the hardware failure with professional precision, ensuring that your repair strategy is both accurate and cost-effective. These tests require no specialized tools, only a logical approach to hardware isolation.
The External Monitor Isolation Test
The most definitive way to determine if your display panel is failing is to connect your device to an external monitor or a television using an HDMI or DisplayPort cable. This test bypasses the internal LCD entirely. If the image on the external monitor is perfect while the laptop screen continues to show lines, flickering, or distorted colors, you have confirmed that your graphics card (GPU) is functioning correctly. The fault lies specifically within the laptop’s internal display assembly.
However, if the visual glitches appear on both the laptop screen and the external monitor, the problem is likely a failing GPU or a corrupted driver rather than the screen itself. This distinction is vital for South African professionals who want to avoid the unnecessary cost of sourcing a new panel when a motherboard repair or software update is required. If your external test confirms a panel failure, you can confidently browse our selection of laptop LCD replacement panels to find a compatible match for your specific model.
Checking the BIOS and Physical Integrity
To eliminate any possibility of a Windows or macOS software conflict, restart your laptop and enter the BIOS or UEFI menu. You usually do this by tapping the F2, F10, or Delete key during the initial boot sequence. The BIOS operates independently of your operating system. If the signs of a failing laptop screen, such as vertical lines or persistent flickering, remain visible in this pre-boot environment, the failure is definitely hardware-based. Software drivers cannot influence the display at this level.
While in the BIOS, perform a physical movement test. Gently open and close the laptop lid while observing the screen. If the flickering intensifies or the image cuts out at specific angles, the issue is likely a frayed or pinched eDP ribbon cable within the hinge housing. You should also check for “pressure spots” or localized bruising on the panel. These often occur if the laptop is carried in a bag without adequate protection, causing the chassis to press against the screen. If the image remains distorted regardless of the lid’s position or the environment, the internal liquid crystal layers have likely suffered permanent degradation. Identifying these specific failure points allows you to move forward with a streamlined solution, restoring your device to full operational capacity.
Navigating Screen Replacement: Sourcing Quality Panels in South Africa
Once you have confirmed the signs of a failing laptop screen through our diagnostic tests, the focus shifts to sourcing a precision-matched component. Laptop displays are not universal; even within the same model range, manufacturers often use different specifications. Identifying the exact requirements for your device ensures a seamless installation and restores your hardware to its original operational standard. Sourcing high-quality parts is the most effective way to protect your investment and avoid the recurring disruptions associated with inferior, grey-market components.
Finding the Right Technical Specifications
Technical compatibility begins with the internal connector. Most modern laptops use either a 30-pin or 40-pin eDP (Embedded DisplayPort) cable. Choosing the incorrect pin count makes the panel physically incompatible with your motherboard. You must also match the original resolution, whether it is standard HD (1366×768), Full HD (1920×1080), or high-end 4K. Upgrading resolution without verifying motherboard support often leads to a blank display or hardware instability.
To find your specific part number, you usually need to remove the screen and check the sticker on the back of the panel. This code, such as “LP156WH4,” is the only way to guarantee a 100% match. You also have a choice between matte and glossy finishes. Matte screens reduce glare in bright South African office environments, while glossy panels offer higher contrast for creative work. Additionally, consider the panel technology; Twisted Nematic (TN) panels are cost-effective for basic tasks, whereas In-Plane Switching (IPS) panels provide superior color accuracy and wider viewing angles. High-quality generic replacements offer a reliable alternative to branded parts, provided they meet these exact technical benchmarks.
The Computech-Solutions Advantage
We provide a streamlined procurement process for professionals across South Africa. Our inventory includes a wide range of laptop LCD replacement panels compatible with major brands like Dell, HP, Acer, Lenovo, and ASUS. Because we understand the urgency of technical disruptions, we offer reliable nationwide shipping to all provinces, from Gauteng to the Western Cape. This ensures that you can source the necessary parts without the delays often found in local retail chains.
Our commitment to a comprehensive service model means you have access to expert technical support to verify your screen model before you finalize your purchase. This precision reduces the risk of ordering the wrong part and further delaying your workflow. Beyond displays, we maintain a full catalog of essential hardware, including replacement batteries and chargers, to keep your professional tools in peak condition. By choosing a specialized partner, you move quickly from identifying the signs of a failing laptop screen to implementing a total, long-term solution that supports your business growth.
Restore Your Professional Productivity
Identifying the signs of a failing laptop screen is the critical first step in maintaining your operational efficiency. By systematically isolating hardware defects from software conflicts and environmental power stresses, you can avoid the high cost of unnecessary repairs. Whether you are dealing with persistent vertical lines or a failed backlight, having a clear diagnostic path ensures you make the right decision for your device’s longevity. You don’t have to navigate technical compatibility alone when seeking a reliable solution for your display issues.
Since 2018, we’ve provided reliable replacement parts and specialist technical support for all major laptop brands across South Africa. Our team ensures you find the exact panel specification to match your hardware requirements, preventing the frustration of incompatible orders. Restore your display today with high-quality laptop LCD panels from Computech-Solutions and benefit from our efficient nationwide delivery. Take control of your hardware performance and return to peak productivity with confidence.
Frequently Asked Questions
Can a flickering laptop screen be fixed without replacing it?
Yes, a flickering screen can sometimes be resolved without a full replacement if the root cause is software-related. Corrupted graphics drivers or incorrect refresh rate settings often mimic hardware failure. If the flickering persists after a driver update and a BIOS check, the issue is likely a loose or damaged eDP ribbon cable, which may only require reseating rather than a new panel.
Is it worth replacing a screen on a 5-year-old laptop?
It’s often a cost-effective decision if the laptop’s core specifications, such as the CPU and RAM, still meet your professional requirements. Since a new mid-range laptop in South Africa can cost upwards of R10,000, replacing the display panel is a fraction of that investment. This upgrade can extend the functional life of a reliable machine by several years.
How much does a laptop screen replacement typically cost in South Africa?
The total cost depends on the panel’s resolution, size, and technology, such as whether it is a standard HD or a high-end OLED display. While entry-level panels are relatively affordable, specialized touchscreens or 4K displays carry a higher price point. Sourcing the part directly and handling the installation can significantly reduce the overall expense compared to standard retail repair rates.
Will a faulty screen damage other parts of my laptop?
A failing LCD panel generally won’t damage other internal components because it is an output device. However, if the screen failure is caused by a short circuit in the video ribbon cable, persistent use could eventually impact the motherboard’s display connector. Addressing the signs of a failing laptop screen early prevents these minor electrical issues from escalating into more complex hardware failures.
Can I still use my laptop if the screen has a small crack?
You can use the device temporarily, but even a hairline crack will eventually spread due to the mechanical stress of opening and closing the lid. Cracks also compromise the liquid crystal layers, leading to “ink blots” that eventually obscure the entire display. It’s safer to source a replacement early before the screen becomes completely unusable during a critical work task.
How do I know if my graphics card is failing instead of my screen?
The most reliable method is to connect your laptop to an external monitor or television. If the visual distortions, such as blocky patches or lines, appear on both displays, the graphics card or its drivers are at fault. If the external image is perfectly clear, you’ve confirmed that the issue is isolated to the laptop’s internal LCD panel.
Does load shedding actually damage laptop screens?
Load shedding is a significant risk factor because of the power surges that occur when the grid is restored. These sudden voltage spikes can damage the sensitive controller board attached to your display. To prevent this, always use a high-quality laptop charger with integrated surge protection and try to keep your device unplugged when the power is scheduled to return.
How long does it take to replace a laptop LCD panel?
The physical replacement of a display panel typically takes between 30 and 60 minutes for a skilled technician. The process involves removing the bezel, disconnecting the internal battery for safety, and swapping the eDP cable to the new unit. Sourcing the correct part is often the most time-consuming step, though nationwide shipping options in South Africa help minimize this delay.
